Wednesday, December 21, 2011

Red Velvet Peppermint Crinkle Cookies

These cookies are amazing! I love discovering new things (which is probably what spawns my love of cooking) and this is a new discovery of a mixture of lovely things (peppermint, red velvet, cookies). Such a beautiful, delicious, holiday-rific treat! This is another one that would be perfect for a cookie exchange. 

Makes about 30
Prep Time: about 30 minutes
Bake Time: about 30 minutes
Total Time: about 1 hour

INGREDIENTS:

1 box red velvet cake mix (I used Duncan Hines)
6 Tablespoons butter
2 eggs
1 teaspoon peppermint extract
1/2 cup crushed peppermint candy or candy canes (about 6 large candy canes)
1/2 cup powdered sugar
1/2 teaspoon cornstarch

DIRECTIONS:

Preheat oven to 375 degrees. Melt the butter and set aside to cool.

Meanwhile, crush the candy canes. (I find it easiest to use the mini candy canes that are individually wrapped...keep them in their packaging so you don't make a big mess. If you only have big candy canes, unwrap them and place them in a plastic bag. Then use a meat mallet and whack away!)

In a large bowl, mix together the cake mix, cooled butter, eggs, and peppermint extract. Add in the crushed peppermint and stir. The dough should be very thick. 

In a shallow dish, mix together the powdered sugar and cornstarch with a fork. 

Form dough into balls and cover with powdered sugar mixture. Place on a cookie sheet 2 inches apart. Bake for 9-11 minutes. Let cool on a wire rack. 

Plate up and serve or give away as gifts.
Merry Christmas!!


Monday, December 19, 2011

Gingerbread Cookies with White Chocolate

I think I've mentioned my love of white chocolate before. It makes everything better. And who knew it was such a great complement to gingerbread? This is such a great recipe for the holidays: soft, chewy gingerbread with a little extra candy on top. It would be perfect for a cookie exchange. Or for Santa Claus.


Makes about 34 cookies
Prep Time: 30 Minutes
Waiting Time: 4 hours*
Bake Time: 10 Minutes
Total Time: about 5 hours (or about 90 minutes if you follow my tip at the bottom)

INGREDIENTS:
3 cups flour
2 teaspoons ground ginger
1 teaspoon ground cinnamon
1 teaspoon baking soda
1/4 teaspoon ground nutmeg
1/4 teaspoon salt
3/4 cup (1 1/2 sticks) unsalted butter at room temperature
3/4 cup firmly packed brown sugar
1/2 cup molasses
1 egg
1/4 cup granulated sugar
1 teaspoon vanilla extract
1 cup white chocolate chips

DIRECTIONS:

Mix flour, ginger, cinnamon, baking soda, nutmeg and salt in a medium bowl and set aside. Beat butter and brown sugar in a large bowl with an electric mixer on medium speed until light and fluffy. 

Add molasses, egg and vanilla. Beat well. Gradually beat in flour mixture on low speed until well mixed. 

Place dough on plastic wrap and form into a flat, thick disk. Wrap in plastic wrap and refrigerate for 4 hours or overnight.*

Preheat oven to 350 degrees. Shape dough into 1-inch balls, roll in granulated sugar, and place 2 inches apart on ungreased baking sheets

Bake 8-10 minutes or until edges of cookies just begin to brown. Immediately press about 5-6 white chocolate chips into center of each cookie. Let cool on wire racks. 

*I was impatient, so instead of waiting 4 hours for the dough to cool in the fridge, I put the dough in the freezer and let it cool for 30 minutes. It worked just fine. Just don't forget about it!

Saturday, December 17, 2011

Nutella Hot Chocolate

Do you want to know a confession? I hate winter. Yes, I love the holidays and the traditions and family all that. But I hate being cold and sick. (Has anyone else been 'kinda sick' for the last 2 months?) Anyway, there is one thing that always cures my winter blues. Hot drinks. Hot chocolate, tea. These things make me happy and they make my body feel good. So I leave you one of my go-to recipes of the season: Nutella Hot Chocolate.

Serves 1
Total Time: 5 Minutes

INGREDIENTS:

1 cup milk
2 Tablespoons Nutella
Pinch of cinnamon (optional)

DIRECTIONS:

Heat milk in a medium saucepan over medium heat, stirring constantly to avoid scalding. Whisk in nutella and stir until fully incorporated. Once heated through, stir in cinnamon (if desired) and pour into a mug. 

Add marshmallows and/or whipped cream as desired. Be warm. 

Friday, November 11, 2011

Vanilla Pudding Cinnamon Rolls

If you add vanilla pudding to cinnamon roll dough, it makes the dough really soft. This cinnamon roll is chewy and soft and lovely. I can't wait to make these for my family on Christmas morning. (Except I'll do all the prep work the night before, of course.)

Yield: About 24 cinnamon rolls
Prep Time: 45 minutes
Rising Time: About 2 hours
Cooking Time: 15 minutes
Total Time: 3 hours

INGREDIENTS:

{for the dough}

1/2 cup warm water
2 Tablespoons active-dry yeast
2 Tablespoons sugar
3.5 oz. package instant vanilla pudding
1/2 cup butter, melted
2 eggs
1 teaspoon salt
6+ cups flour*

{for the filling}

1 cup butter, softened to room temperature
2 cups brown sugar
4 teaspoons cinnamon

{for the frosting}

8 oz. cream cheese**
1/2 cup butter, softened to room temperature
1 teaspoon vanilla
3 cups confectioner's sugar
2-3 Tablespoons milk

*If you'd like to increase the amount of fiber in your diet, use half whole-wheat flour and half all-purpose flour. 
**For a healthier option, use neufchatel cheese.

DIRECTIONS:

In a small bowl, combine water, yeast, and sugar. Stir until dissolved and set aside. 

In a large bowl, take vanilla pudding mix and prepare according to package directions. Add butter, eggs, and salt. Mix well. Then add yeast mixture. Blend. Gradually add flour and knead until smooth, being careful not to overflour the dough. It should be very soft but not sticky. Place in a greased bowl. Cover and let rise until doubled. 

Once dough has doubled in size, divide into two equal parts. Roll dough onto a floured surface 17 x 21 inches in size. Take a half cup of softened butter and spread it over the dough. In a medium bowl, combine 2 cups brown sugar and 4 teaspoons cinnamon. Sprinkle half the mixture over the top. Roll up very tightly. With a knife, put a notch every 1 1/2 inches. Cut with thread or serrated knife. Place on a lightly greased cookie sheet about about 1 inch apart. Repeat this process with the remaining dough. Cover rolls and let rise until doubled in size again.

Bake at 350 degrees for 15-20 minutes. Remove when they start to turn golden. (Do not overbake.) 

To make the frosting, combine butter and cream cheese and mix well, then add vanilla and sugar and mix again. Then add milk for desired consistency.

Frost warm rolls with cream cheese frosting. 

Wednesday, November 9, 2011

Italian Baked Chicken and Pastina

I love the smell of Italian food in my kitchen. It warms up the house and the aroma just feels like family. This pasta is a dish I'm sure I will be coming back to again and again. It's one of those "grub" meals that just tastes good and fills your belly. It also uses ingredients that I usually always have on hand. Double-score!

Yield: 8 servings
Prep Time: 15 min
Cook Time: 45 min
Total Time: 1 hour

INGREDIENTS:

2 cups pastina pasta (or any small pasta - I used whole wheat shells)
4 Tablespoons olive oil
2 large boneless, skinless chicken breasts, cubed
1 small onion, diced
2 cloves garlic, minced
2 (14.5 ounce) cans diced tomatoes with juice
2 cups shredded mozzarella cheese
1/2 cup chopped fresh flat-leaf parsley (may substitute with 1/4 cup dried parsley or other Italian herbs)
1/2 teaspoon kosher salt
1/2 teaspoon black pepper
1/2 cup bread crumbs
1/2 cup grated parmesan cheese
2 Tablespoons butter, plus more for buttering the baking dish

DIRECTIONS:

Preheat the oven to 400 degrees.

Bring a medium pot of salted water to boil over high heat. Add the pasta and cook just until tender, stirring occasionally, about  5 minutes. Drain pasta and place in a large mixing bowl. 

Meanwhile, put the olive oil in a medium saute pan over medium heat. Add the chicken and cook for 3 minutes. Add the onions and garlic, stirring to combine, and cook until the onions are soft and the chicken is cooked through, about 10 minutes more. 

Add the chicken mixture to the bowl with the cooked pasta. Add the canned tomatoes, mozzarella cheese, parsley, salt, and pepper. Stir to combine. Place the mixture in a buttered baking dish. (9" x 13" or similar in size will do.) 

In a small bowl, mix together the bread crumbs and parmesan cheese. Sprinkle over the top of the pasta mixture. Dot the top with small bits of butter. Bake until the top is golden-brown, about 30 minutes.

Buona Vita!

Sunday, November 6, 2011

Whole Wheat Waffles

My favorite breakfast items are those that require syrup to eat them. This can be a problem as those are often the least healthy. Well, let me present you with a gorgeous, healthy, and delicious way to eat waffles. 

Start with whole wheat waffles (recipe below), top with 3 large dollops of yogurt (I used peach), add fresh berries, then drizzle with maple syrup. Good morning to you!

Yield: 6 Belgian-style waffles
Prep Time: 5 minutes
Cooking Time: About 5 minutes per waffle

INGREDIENTS:

3 cups whole wheat flour
4 teaspoons baking powder
1 teaspoon salt
4 Tablespoons sugar
2 large eggs
3 cups lukewarm milk
2/3 cup melted butter or vegetable oil

DIRECTIONS:

Preheat waffle iron while you make the batter. Whisk together the egg, milk, and butter. Add the flour, baking powder, salt, and sugar. Stir until just combined. Pour 1 cup of batter onto a greased waffle iron and cook as directed by the instructions for your waffle iron. 

If you have leftovers, wrap each waffle individually with saran wrap and place in a large ziploc bag. Keep in the freezer. When ready to eat, unwrap waffle and heat in the microwave for 90 seconds.

Toasted Marshmallow Milkshake

Bradford and I traveled to New York about a month ago. While we were there, we ate some delicious food. One such treat was a toasted marshmallow milkshake at Stand Burger. I was definitely skeptical at first. Marshmallows and milkshakes was not a combination I had considered before. As soon as I took my first sip out of the giant red straw, I entered my happy place and did not want to leave it. It was one of the best milkshakes I had tasted. (Click here to read Gourmet Magazine's Francis Lam's description of the heavenly treat.)

Of course I immediately thought, how can I re-create this at home, when I'm 2500 miles away from the nearest Stand Burger? Luckily, Gourmet magazine did the dirty work for me.

Serves 1
Prep Time: 5 min

INGREDIENTS:

3 large scoops vanilla ice cream*
1 Tablespoon whole milk**
1 large dollop plain yogurt***
5 Kraft Jumbo Jet-puffed marshmallows
Whipped Cream

**I used 1% milk, because that's what I keep in my fridge
***Stand uses Woodstock Water Buffalo Milk yogurt, but Gourmet says it doesn't make much difference what type of yogurt you use. I used Greek yogurt.

DIRECTIONS:

Toast marshmallows under a broiler. (Note: For the first time in my cooking career, I set a fire in my kitchen trying to do this. Ha! To avoid this, put your broiler on LOW, place marshmallows in the CENTER of the oven, and do not broil for longer than 2 minutes MAX. To be sure you don't overtoast, check the marshmallows at 1 minute, then keep a close eye on them until they're done. It's a quick process.)

Put the milk, ice cream, and yogurt in a blender then blend until you get a "donut". Add three of the toasted marshmallows to the blender, and whirl it just until they're all broken up and distributed evenly. Be careful not to overblend, making it too melty. 

Pour shake into a glass, top with a dollop of whipped cream, add the last two marshmallows on top, and serve with an extra-wide straw. 

Repeat if necessary. 

Wednesday, November 2, 2011

Creamy White Bean Chili

Fall. is. here. And along with it, pumpkin flavors, hearty soups, and warm drinks. The Manhattan Beach Holiday Pier Lighting is in 2 weeks and daylight savings time ends this weekend (tear). 

To counter my sadness that the long summer days are over, I've been making lots of warm, delicious treats, including this Creamy White Bean Chili. Since I was young, I've always enjoyed "white" versions of food: white chocolate, white cheddar, white pizza. I can now add white chili to that list. This soup rocks my socks off. It blew Bradford's socks off too. A big holiday cheer for that! 

Serves 4
Prep Time: 15 Minutes
Cooking Time: 30 Minutes
Total Time: 45 Minutes

INGREDIENTS:

1 pound boneless, skinless chicken breasts, cooked and shredded
1 medium onion, chopped
1 1/2 teaspoons garlic powder or 2 garlic cloves, minced
1 Tablespoon olive oil
2 cans (15.5 oz. each) Great Northern Beans, drained and rinsed
1 can (14.5 oz.) chicken broth
2 cans (4 oz. each) chopped green chilies
1 teaspoon salt
1 teaspoon ground cumin
1 teaspoon dried oregano
1/2 teaspoon pepper
1/4 teaspoon cayenne pepper*
1 cup sour cream or plain greek yogurt**
1/2 cup whipping cream
Fresh cilantro for garnish (optional)

*If you have a mild palette, you may omit or decrease the amount of cayenne pepper
**I recommend using the Greek yogurt if you have it. It is a much healthier option that does not decrease from the taste or flavor of this dish at all. :)

DIRECTIONS:

In a large saucepan, saute onion and garlic in a large pan until onions are translucent and soft, about 5 minutes. Add shredded chicken, beans, broth, chilies and seasonings. Bring to a boil. Reduce heat and simmer, uncovered for 30 minutes, stirring occasionally. Remove from heat and stir in whipping cream and sour cream or greek yogurt. Garnish with fresh cilantro if desired and serve immediately.

{Slow Cooker Option}

In a slow cooker, place 1 pound full chicken breast (fresh or frozen). Add chopped onion, garlic, beans, green chilies, and all of the spices. Do not add sour cream/greek yogurt or whipping cream yet! Reduce chicken broth amount to 12 oz. (about 1 1/2 cups) and pour in over the other ingredients. Stir the mixture to incorporate dry spices and cook on low for 5-7 hours (fresh chicken cooks in less time while frozen chicken takes longer to cook). 

Remove chicken and shred it into bite size pieces. Return to slow cooker. In a small bowl, whisk together cream and sour cream or greek yogurt until smooth. Add the cream mixture to the crock pot and stir to incorporate. Let soup cook just until heated through. Enjoy!

Monday, October 24, 2011

BYU Mint Brownies

For all of the Cougars reading this, I know the title of this post is enough to sell you on the recipe. Go make it. For anyone else, these brownies are divine. Heavenly. I wish I could bottle up my mom's reactions when she eats some of my food. I brought a pan of these over to her house last week and before we had even eaten dinner, she sneaked a peak under the foil to look at the mint brownies. Her knees buckled and she kind of shook her body with excitement. So funny. 

Growing up, these brownies were such a treat every time we went to Utah and now, it's nice to know I can make them in my own home.

From BYU Dining via The Girl Who Ate Everything

YIELD: one 9x13-inch pan of brownies
PREP/COOK TIME: 90 minutes; COOL TIME: 1 hour

INGREDIENTS:

{for the brownies}:

1 cup margarine or butter, melted
1/2 cup cocoa
2 Tablespoons honey
4 eggs
2 cups sugar
1 3/4 cup flour
1/2 Tablespoon baking powder
1/2 teaspoon salt
1 cup chopped walnuts (optional--I keep them out)
12 oz. chocolate icing (make your own or purchase from the store)

{for the mint icing}:

5 Tablespoons margarine or butter, softened
dash of salt
3 Tablespoons milk
1 Tablespoon light corn syrup
2 1/3 cups powdered sugar
1/2 teaspoon peppermint extract
1-2 drops green food coloring (again, optional--I left it out)

DIRECTIONS:

Start by making the brownies. Pre-heat oven to 350 degrees.

Melt the margarine or butter and stir in the cocoa. Allow to cool. Add honey, eggs, sugar, flour, baking powder, and salt. Mix well. If using, add nuts. Pour batter into a greased 9x13 inch baking pan. Bake for 25 minutes. Cool. (Though it may be tempting, resist putting brownies in the freezer or fridge to cool as this will dry them out slightly. Let them cool naturally at room temperature.)

Prepare the mint icing. Soften margarine or butter. Add salt, corn syrup, and powdered sugar. Beat until smooth and fluffy. Add peppermint extract and (if using) food coloring. Mix. Add milk gradually until the consistency is a little thinner than cake frosting.

Spread mint icing over cooled brownies. Place brownies in the freezer for a short time to stiffen the icing. Remove from the freezer and carefully add a layer of chocolate icing.

Enjoy!

Monday, September 5, 2011

Baked Creamy Chicken Taquitos

I've seen these floating around the blogosphere for a little while now and I finally made them. 

Three things:

1. These are PERFECT for football season!
2. They are absolutely delicious.
3. They can be made ahead of time, frozen, and popped in the oven when you're ready to eat.

Need I say more?


Makes 12

INGREDIENTS:

3 oz. cream cheese, softened
1/4 cup green salsa
1 Tablespoon lime juice
1/2 teaspoon ground cumin
1 teaspoon chili powder
1/2 teaspoon onion powder
2 cloves garlic, minced
3 Tablespoons chopped cilantro
2 Tablespoons chopped green onion
2 cups shredded cooked chicken (My go-to recipe is here. Just cook it, then shred it.)
1 cup shredded Mexican flavored cheese
Medium-size flour or corn tortillas
kosher salt (optional)
cooking spray

DIRECTIONS:

Preheat oven to 425 degrees. Line a baking sheet with foil or parchment paper.

In a large bowl mix the first 7 ingredients. Once combined, stir in the cilantro and green onions. Add the chicken and cheese and mix thoroughly. 

Working with a few tortillas at a time, heat them in the microwave between two paper towels until they are soft enough to roll (about 20-30 seconds).

Spoon 2 heaping tablespoons of the chicken mixture onto the lower third of the tortilla. Roll the tortilla as tightly as you can. Place the rolled tortilla seam side down on the baking sheet. Repeat with remaining tortillas until the mixture is gone. Make sure the taquitos are not touching each other. Spray the tops lightly with cooking spray and sprinkle lightly with kosher salt. (For a healthier option, eliminate the salt. It's not necessary.)

Bake for 15-20 minutes or until crisp and golden. 

Serve with salsa, sour cream, and/or guacamole. 

For tips on freezing, click here

Wednesday, August 31, 2011

Roasted Broccoli

 I've never been much of a picky eater, but as a child, I did not like broccoli. It's still not my favorite, but I've grown to appreciate these little trees. And, last week at Costco, while we were standing in front of a giant bag of broccoli, I discovered that Bradford loves it. So, we eat broccoli. 

This is my favorite, fool-proof and simple way to cook broccoli.

INGREDIENTS:
fresh broccoli 
olive oil
salt & pepper
DIRECTIONS:

Pre-heat the oven to 400 degrees. Spread broccoli evenly on a baking pan. (For easier clean-up lay a sheet of foil on the pan first.) Drizzle broccoli with olive oil and sprinkle salt and pepper on top. Using tongs or a spoon, mix broccoli until olive oil is evenly distributed.

Bake in the oven for 10 minutes.

*For a different variation: With 2 minutes left of baking, sprinkle broccoli with cheddar cheese.

Wednesday, August 24, 2011

Corn...the simple way

This summer I learned how to make corn. It's not grilled or roasted. I don't use an oven or a stove. I'm a little embarrassed to admit it, but this corn is cooked in a rectangular-shaped contraption that sits on my counter. It's called a microwave. I try not to use it often, but sometimes it just makes cooking so much easier. 

This may be an old recipe to many, but for me, it has transformed the way I think about corn. It has made summer cooking so much easier and it has also made for a healthier way to add a starch to each meal.

INGREDIENTS:

1 ear of corn 
wax paper
a tiny bit of butter
a tiny bit of salt
a tiny bit of pepper

DIRECTIONS:

Wrap the ear of corn into a sheet of wax paper. Twist the ends of the wax paper and tuck under. On a folded paper towel, place ear of corn in the microwave. Cook on high for 2-3 minutes. 

Remove corn from microwave, let cool and remove wax paper. Using a sharp knife, cut corn off the cob. While corn is still warm, add butter, salt and pepper. Mix until butter is melted and serve.

*This recipe may be doubled or tripled as needed. If cooking two ears of corn at one time, change microwave cook time to 5-6 minutes.

Friday, August 12, 2011

Cinnamon Bread

  There's something about the true simple taste of cinnamon. It's one of those nice, "home-y" smells. While I do not particularly care for cinnamon scented candles, I love the smell of real cinnamon baking in the oven. When I was a kid, I would often make myself a "treat" by buttering up some warm toast and sprinkling cinnamon and sugar on top. (Oh wait, I just did that the other night!) Let's get back on track. This bread is home-y delicious.

Adapted from AllRecipes.com

INGREDIENTS:
2 cups all-purpose flour
1 cup white sugar
2 teaspoons baking powder
1/2 teaspoon baking soda
3 1/2 teaspoons ground cinnamon, divided
1 teaspoon salt
1 cup buttermilk*
1/4 cup vegetable oil
2 eggs
2 teaspoons vanilla extract
4 Tablespoons brown sugar
4 teaspoons margarine

DIRECTIONS:

Preheat oven to 350 degrees. Grease and sugar one 9"x5" loaf pan.

In a medium bowl, measure flour, 1 cup sugar, baking powder, baking soda, 1 1/2 teaspoons cinnamon and salt. In a large bowl, beat oil, eggs and vanilla. Gradually add dry ingredients until just incorporated.

Pour into prepared loaf pan. Smooth on top.

Sprinkle topping over smoothed batter. Using a knife, cut in a light swirling motion to give a marbled effect.

Bake for 50-60 minutes. Bread is done when a knife inserted comes out clean. Let cool, serve and enjoy!

Thursday, August 4, 2011

Mediterranean Guacamole

 In case you haven't noticed, I sort of have a thing for chick peas on this blog (these are more commonly known as garbanzo beans, but I prefer the more girly name of "chick" peas). I tend to use them a lot in my cooking and I always seem to have a handful of cans in my kitchen. There are many health benefits associated with chick peas. They are an excellent source of fiber and protein and they contain many key antioxidants, including quercetin, the key ingredient in FRS energy drink. In a recent study, participants reported higher satisfaction in their diet when chick peas were consumed. To top it all off, their taste is not overpowering which means that it mixes well with endless types of foods, like avocados!

This recipe can be served as an appetizer, or as a meal if you are looking for something small, quick and simple. It is satisfying, scrumptious and good-for-you.

INGREDIENTS:
2 avocados, pitted, peeled and diced
1 can chick peas, drained, rinsed and mashed slightly with a potato masher
1/2 cup feta cheese (may also substitute with goat cheese)
1 Tablespoon lemon juice
1/2 teaspoon garlic salt
1/4 teaspoon lemon pepper
1/4 teaspoon paprika
dash red cayenne pepper

DIRECTIONS:

Mix all ingredients together. Serve with tortilla chips. Voila!

Monday, August 1, 2011

Fresh Strawberry Yogurt Cake

It is the season of strawberries and I love it. Bundt cakes are just so pretty and I love the slices they create. With a slight hint of lemon and the creamy texture of yogurt, this cake is fresh, moist, and it screams summer. You have to be careful with this cake, though. Similar to the white chocolate raspberry bread pudding, it makes a great breakfast!


INGREDIENTS:

1 cup (2 sticks) butter, softened
2 cups sugar
3 eggs
3 Tablespoons lemon juice, divided
Zest of 1 lemon (optional)
2 1/2 cups all-purpose flour, divided
1/2 teaspoon baking soda
1/2 teaspoon salt
8 oz. plain or vanilla yogurt
12 oz. (about 2 cups), fresh, diced strawberries
1 cup powdered sugar

DIRECTIONS:

Pre-heat oven to 325 degrees. Grease and flour a 10-inch bundt pan. 

Sift together 2 1/4 cups flour, baking soda and salt. Mix in the lemon zest and set aside.

Using an electric mixer, cream together the butter and sugar until light and fluffy, about 2 minutes. Beat in the eggs, one at a time, then add 1 Tablespoon lemon juice. Alternate beating in the flour mixture and the yogurt, blending until just incorporated. 

Toss the strawberries with the remaining 1/4 cup flour. Gently fold them into the batter. 

Pour the batter evenly into the bundt pan. Bake in pre-heated oven for 60 minutes, or until a knife inserted into the center comes out clean.  

Allow to cool 10 minutes, then turn onto a wire rack and cool completely. Mix together the remaining 2 Tablespoons lemon juice with 1 cup powdered sugar. Drizzle over the top of the cake.

Monday, July 25, 2011

Grilled Chicken with Mango Avocado Salsa

We have been buying produce like it's nobody's business lately! At one point this week, we had the following items in our kitchen: cantaloupe, watermelon, avocado, tomatoes, mangoes, plums, nectarines, strawberries, blueberries, cherries and bananas. For only two people, that's a lot of fruit! So I decided to make some delicioso salsa. It could have been paired with just about any type of fish (mahi mahi, halibut, salmon, tilapia), but I decided to keep it simple and convenient (translate: I didn't have any fish in my fridge) and serve it with chicken. The result was simple, fresh and tasty!

(Bonus: we had some leftovers, so I served it up the next morning in an omelet. Who knew mangoes could taste so good with eggs!)

Inspired by Gwyneth Paltrow

INGREDIENTS:
1 ripe mango, diced
1 ripe avocado, diced
2 ripe beefsteak tomatoes, seeded and diced
5-6 green onions, finely chopped
1 teaspoon lime juice
garlic salt, to taste
lemon pepper, to taste
DIRECTIONS:

Mix mango, avocado, tomatoes, green onions, and lime juice. Season to taste with garlic salt and lemon pepper. 

Using a sharp knife, cut blackened chicken breasts in half, lengthwise.

On a plate, place chicken breasts. Spoon a generous serving of the mango avocado salsa over the chicken. 

Enjoy!!

Wednesday, July 20, 2011

Catherine's Enchiladas

My favorite way to cook involves no recipe. No set rules to follow, no cleaning of measuring cups in between uses, no boundaries. The risk of this is that there is also no guarantee of a delicious meal at the end of the cooking. Fortunately, in this case, there was a very delicious meal at the end of my enchilada cooking venture. 

I hope you try this.

INGREDIENTS:

2 chicken breasts
garlic salt
lemon pepper
olive oil
6 large flour tortillas
16 oz. green salsa (maybe substitute with red enchilada sauce)
1 small can diced green chiles
1/4 cup milk
1/2 onion, finely chopped
1 clove garlic, minced
1/4 teaspoon paprika
1/4 teaspoon cumin
dash cayenne papper
1-2 cups shredded Mexican cheese

DIRECTIONS:

Start by making simple blackened chicken. Using two forks, shred cooked chicken and set aside. 

Heat oven to 350 degrees. 

Heat olive oil in a saucepan over medium heat. Add onions and garlic and saute until onions are translucent, about 5 minutes. Add green chiles, green salsa, milk, shredded chicken, paprika, cumin, and cayenne pepper and mix all together. Let simmer for about 5 minutes. 

Warm tortillas in a microwave or oven.

Spread 1/4 cup of chicken mixture in the bottom of the dish. One by one, fill each tortilla. Using tongs, spread chicken down the middle of the tortilla, add cheese, roll and set seam-side down in the baking dish. When finished rolling, top all enchiladas with remaining chicken mixture. Top everything with cheese.

Bake in the oven for 15 minutes. 

Enjoy!!!

Friday, July 15, 2011

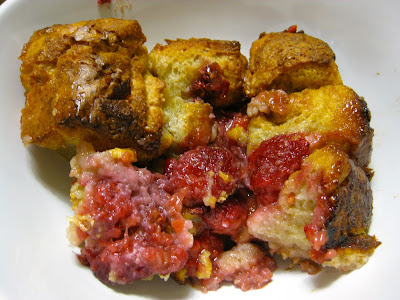
White Chocolate Raspberry Bread Pudding

Some foods are a bit more difficult to photograph than others. Bread pudding is one of them. I can only hope that this photograph does justice to the decadent, comforting, and mouth-watering taste and texture of this delicious white chocolate raspberry bread pudding. It is really, really good, and it gets better with age. I made it with the intention to eat it as dessert (which I did), but the last 4 mornings in a row I've found myself dishing this up for breakfast. The chocolate in this recipe is really subtle, so it doesn't feel overly indulgent. Such a great way to start the day.

Are you ready for another amazing fact about this recipe? It is BETTER with stale bread. One of my biggest annoyances and challenges as a cook is not letting food to go waste. So when you buy a french loaf and it starts to get stale, don't fret! Make bread pudding!

Just one day after I made this, I watched an episode of Kelsey's Essentials where she made a tres leches bread pudding in a slow cooker! It looks equally delicious. Check it out here.


INGREDIENTS:

1 loaf of french bread (16 oz.)*
1 cup of white chocolate chips (or the whole bag if you're really feeling chocolate-y)
1 pint of fresh raspberries (this is two of those small rectangle packages)
6 eggs
2 cups milk
1 teaspoon vanilla
1 cup sugar
2 Tablespoons butter

*I used a whole wheat french bread loaf and it is delicious and nutritious!

DIRECTIONS:

Cut up the bread into bite-size pieces. (This recipe works best when the bread is stale.) 

In a bowl mix together the eggs, milk, vanilla, and sugar. Pour over the bread and let sit for an hour to allow the bread to soak in the liquid. You can also do this ahead of time (or the night before) and let it sit covered in the fridge.

Fold in the chocolate chips and raspberries. 

Spray a 2-quart casserole dish with cooking spray and put the bread pudding into it. Put dabs of butter all over the top. 

Place into a 350 degree oven for 1 hour. 

Let cool and enjoy!!!

Monday, June 27, 2011

Chana Masala

I have really been loving Thai food lately, but have yet to learn how to make it. Indian food is a close second and there seems to be more recipes for Indian food in the blogosphere. I found this recipe for Chana Masala and thought it was genius that it uses coconut milk (a staple in Thai food). Then I realized that coconut milk is a common dairy substitute for vegans and most chana masalas do not use coconut milk. But I actually seem to think this meal tastes a lot better with the lovely, subtle island taste of coconut milk. 

(If you'd like another lovely option for Chana Masala without coconut milk, click here.)


INGREDIENTS:

2 cans chickpeas, drained and rinsed
2 onions sliced
3 cloves garlic, minced
1/4 teaspoon ginger
2 15 oz. cans diced tomatoes*
1 can coconut milk
1/2 teaspoon red pepper flakes
1 teaspoon ground cumin
2 teaspoons ground coriander
1/2 teaspoon turmeric
1/2 teaspoon fennel seeds
1 handful fresh coriander
1/4 teaspoon garam masala
juice of 1/2 a lemon

*I only had tomatoes with diced green chiles and it worked just fine.

DIRECTIONS:

Thinly slice the onions and place into a deep frying pan with olive oil. Place over medium heat for about 10 minutes, or until they cook down. 

Add ginger and garlic and cook for a few more minutes. Add tomatoes, pepper flakes, cumin, ground coriander, turmeric, and fennel seeds. Let simmer for about a minute, then add chick peas. Stir them in, then add the coconut milk. 

Stir all ingredients together and let simmer for about 20 minutes, or until much of the liquid has boiled out. Be sure to stir every 5-10 minutes, so nothing sticks. 

After much of the liquid has bubbled away, add fresh chopped coriander and garam masala. Squeeze lemon juice onto the mixture and add salt to taste.

Serve immediately with rice or flatbread.

Enjoy some grub!

Sunday, June 12, 2011

Chick Pea Salad

I have a special place in my heart for Mediterranean food as my grandmother often makes it for large family gatherings. (She perfected her skills after living in Baghdad and Beirut for 20+ years.) I love the simple salads and side dishes this food genre has to offer. And I love the nutritional and filling nature of chick peas. And who doesn't love feta cheese? Lots of love here in this dish. :)

INGREDIENTS:

2 cans chick peas, drained, rinsed and patted dry
2 garlic cloves, minced
1 1/2 Tablespoons fresh mint, chopped
olive oil
Juice of one lemon
1/3 cup feta cheese
salt and pepper to taste

DIRECTIONS:

Pre-heat oven to 375 degrees. In a bowl, mix chick peas, garlic, and mint and drizzle with olive oil. Mix to coat. Lay mixture in a single layer on a baking sheet.

Bake for 8-10 minutes. Remove mixture from oven, and let cool slightly. Transfer chick peas to a serving bowl and add lemon juice, feta cheese and salt and pepper.

Enjoy!

Friday, June 10, 2011

Strawberry Bread

I have always been a huge fan of strawberries. I am so happy that summer is here and strawberries are widely available. This recipe for strawberry bread ironically uses frozen strawberries which is wonderful because it means you can enjoy the fabulous fruit year-round!!!


INGREDIENTS:

1 cup oil
2 cups sugar
4 eggs, beaten
3 cups flour
1 teaspoon baking soda
1 teaspoon salt
2 10-oz. packages frozen strawberries, thawed, with the juice (reserve 1/2 cup for topping)

DIRECTIONS:

Mix oil, sugar and eggs. Add flour, baking soda, salt, and strawberries with juice. Mix well until thoroughly blended. Pour into 2 loaf pans, greased and sugared or lined with wax paper. Bake for 335 degrees for 1 hour. (Check at 50 minutes for doneness.) Serve warm or cold slices topped with butter and reserved berries. Sinfully delightful.

Sunday, May 15, 2011

Carmelitas

I've been making/eating a lot of Mexican food lately and it seems like the best desserts to go with Mexican involve caramel.That sweet creamy treat is so adored by Mexicans. This recipe for Carmelitas involves adding chocolate chips and nuts, but I kept it simple, choosing to focus on the simple, lovely taste of caramel.

INGREDIENTS:

2 cups flour
1 3/4 cups quick-cooking oats
1 1/4 cups brown sugar
1 teaspoon baking soda
1/4 teaspoon salt
1 1/4 cups (2 1/2 sticks) unsalted butter, softened
1 cup chocolate chips (optional)
3/4 cup chopped pecans (optional)
1 1/2 cups salted caramel sauce
2 1/2 Tablespoons flour

DIRECTIONS:

Preheat the oven to 350 degrees. Grease a 9 x 13 inch pan.

Combine the flour, oats, brown sugar, baking soda, salt, and butter in a mixing bowl. Beat on low until crumbly. Divide into two equal portions.

Press half the crumb mixture into prepared pan. Bake for 10 minutes. Remove and cool slightly.

If using chocolate chips and pecans, sprinkle over the cooled crust. Mix the salted caramel sauce and flour together and drizzle over the pan. Top with the remaining crumb mixture.

Return to the oven and bake for an additional 15-20 minutes or until the crust starts to brown. Allow the pan to cool and refrigerate until the caramel filling is set.

Cut into bars and serve.

Salted Caramel Sauce

image via

I have always been a fan of caramel. Despite the occasional toothache it gives me, I love the creamy, sweet texture. When I found out that caramel is actually very simple to make, I got very excited. It is basically the same technique as making a simple syrup, except you let it burn a little longer. That is what gives it the brown color.


INGREDIENTS:

1 cup sugar
1/4 cup water
3/4 cup heavy cream (I used 1% milk)
3 1/2 Tablespoons unsalted butter
1 teaspoon sea salt or kosher salt

DIRECTIONS:

In a heavy-bottomed saucepan, combine the sugar and water over medium-low heat until the sugar dissolves. Increase the heat and bring to a boil, without stirring. Boil until the syrup is deep amber in color, about 5-7 minutes. 

Remove the sugar from the heat and carefully whisk in the heavy cream or milk. The mixture will bubble (this kind of freaked me out at first--I thought I had messed up the recipe--but everything turned out great). Stir in the unsalted butter and salt.

Transfer the caramel to a dish and cool.

*Salted caramel sauce will keep in the refrigerator up to 2 weeks. Reheat before serving.

Sunday, May 8, 2011

Linda Schlauder's Famous Orange Rolls

A while back, I mentioned some amazing orange rolls that a friend's mom makes for holiday gatherings. Having spent many Thanksgiving dinners at this home, I (and many others) have come to love and adore these orange dinner rolls. Linda was kind enough to share this recipe me. 

Today, I brought these to a Mother's Day family gathering and they. were. a. hit. I may have actually cursed myself because everyone has now asked for these rolls to be brought to all future family gatherings. I am okay with this because they are not incredibly difficult. (No kneading.)

These are delicious.

INGREDIENTS:

3 Tablespoons dry yeast
2/3 cup lukewarm water
1 cup butter, chopped
1/2 cup sugar
2 teaspoons salt
2 cups milk, scalded
2 eggs, beaten
6 cups flour
14 Tablespoons butter, softened
1 cup sugar
Grated peel of 2 oranges

DIRECTIONS:

In a small bowl, dissolve the yeast in the water. Combine the chopped butter, 1/2 cup sugar and salt in a large bowl. Add the hot milk and mix to dissolve butter. Let stand until lukewarm.

Add the yeast, eggs and flour and mix well to form a sticky dough. (The dough should actually be sticky so don't feel the need to add more flour.) Let rise, covered, in the refrigerator for 8 hours or longer. 

Remove dough from the refrigerator 2 to 2 1/2 hours before baking. 

Divide the dough into halves and roll each into a rectangular shape on a floured surface. Mix the softened butter, 1 cup sugar, and grated orange peel in a bowl. Spread on the dough. Roll up the dough to enclose the filling. Cut the dough into 1-inch pieces using dental floss or thread. Place into greased muffin cups and let rise until doubled in bulk (about 20-30 minutes). 

Bake at 375 degrees for 10-12 minutes or until tops are golden brown. Enjoy!

Monday, May 2, 2011

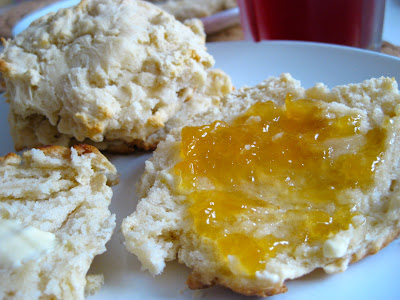
Sour Cream Biscuits

I just finished reading a novel, written by my grandfather, about his own father, who died three months before his birth. My great-grandfather, Lionel, grew up in Morgan, UT and at the age of 10, moved to Idaho where his father settled the town of Parker (Parker is my maiden name). My great-great-grandmother, Eliza Ann, was quite an inspiring figure, adjusting to many changes and always providing a comfortable, welcoming home to friends a family who needed love and support. Reading about Eliza Ann inspired me to cook simple, country food. In the book, my Grandpa mentions how, after dinner, Eliza Ann would give her husband biscuits with jam to satisfy his sweet tooth. So simple. So delicious.

From: Razzle Dazzle Recipes
Makes 4 biscuits

INGREDIENTS:

1 cup self-rising flour*
1/4 teaspoon baking soda
3/4 cup sour cream
2 teaspoons vegetable oil

*As a substitute for self-rising flour, place 1 1/2 teaspoons baking powder and 1/2 teaspoon salt in a measuring cup. Add all-purpose flour to equal 1 cup.

DIRECTIONS:

Pre-heat oven to 425 degrees. 

In a bowl, combine flour and baking soda. Add sour cream and oil. Stir until moistened. Turn onto a floured surface and knead, adding flour as necessary, until dough is smooth and easy to handle.

Roll out dough to a 3/4 inch thickness and cut with a 2 1/2 inch biscuit cutter. (Or divide into four separate "balls" using your hands and flatten down, like you would if you were making peanut butter cookies.)

Place on a greased baking sheet and lightly spray tops with non-stick cooking spray.

Bake for 10-12 minutes or until golden-brown.

Monday, April 25, 2011

Ina Garten's Lemon Chicken Breast

I bought a large bag of lemons at the grocery store this weekend. Inspired by summer, freshness, and simplicity, I am on a mission to use more lemons in my cooking. This dish is great: chicken the way it should be. Fresh and delicious. Sometimes a little skin tastes good. :)

From She's Cookin'

INGREDIENTS:

1/4 cup good olive oil
3 Tablespoons minced garlic (9 cloves)
1/3 cup dry white wine
1 Tablespoon grated lemon zest (2 lemons)
2 Tablespoons freshly squeezed lemon juice
1 1/2 teaspoons dried oregano
1 teaspoon minced fresh thyme leaves
Kosher salt and freshly ground pepper
4 boneless chicken breasts, skin on (6-8 ounces each)
1 lemon

DIRECTIONS:

Preheat oven to 400 degrees.

Warm the olive oil in a small saucepan over medium-low heat, add the garlic, and cook for just one minute, but don't allow the garlic to turn brown.

Turn off the heat, add the white wine, lemon zest, lemon juice, oregano, thyme and 1 teaspoon salt, and pour into a 9x12 inch baking dish.

Pat the chicken breasts dry and place them skin side up over the sauce. Brush the chicken breasts with olive oil and sprinkle them liberally with salt and pepper. Cut the lemon in eight wedges and tuck it among the pieces of chicken.

Bake for 30 to 40 minutes, depending on the size of the chicken breasts, until the chicken is done and the skin is lightly browned. If the chicken isn't browned enough, put it under the broiler for two minutes.

Remove from oven, cover the pan tightly with aluminum foil and allow to rest for 10 minutes. Sprinkle with salt and serve hot with the pan juices. 

Friday, April 1, 2011

Spaghetti with Tomato, Turkey, and Spinach

I have a dream of going grocery shopping on a Saturday, and using every single thing I bought from the grocery store the following week, in 5 or 6 delicious meals, without one thing going to waste. That is my goal. And this recipe gets me one step closer to getting there.

Remember the Tuscan Tomato Soup from Tuesday? Well, since that soup uses real (or canned) chunky tomatoes, it is a thicker soup, which means that it doubles as a wonderful pasta sauce! Let's get do the details:

INGREDIENTS:

1 - 1-1/2 lb. ground turkey
1-2 cups leftover Tuscan Tomato Soup
1 jar spaghetti sauce (I prefer Prego Chunky Garden)
1-2 cups fresh spinach
1 lb. cooked whole wheat spaghetti (or any type of pasta)

DIRECTIONS:

In a large skillet over medium-high heat, brown the ground turkey. When all the meat is browned, slowly drain the liquid from the pan. To the turkey, add Tuscan Tomato Soup and 1 jar store-bought spaghetti sauce. Mix together and let simmer for 5 minutes. Add spinach leaves and stir until leaves are just wilted.

Add sauce to cooked pasta and enjoy.

Tuesday, March 29, 2011

Tuscan Tomato Soup

By far, the majority of my recipes are found on the internet, through other blogs, random google searches, or the trusty allrecipes.com. While I do appreciate the ease of the internet, I love the Williams Sonoma Cookbook. It is beautifully organized with pictures of each dish (a must!) and it teaches basic steps for delicious meals (if only I had time to make everything). The cover of this book represents the essential ingredients in all good cooking: olive oil, eggs, garlic, salt, fresh herbs, lemon, and parmesan cheese. I feel pretty confident that almost every basic dish is made better with these ingredients.

So, tomato soup. I kind of love it. I feel like it's the perfect combination between a brothy soup and a creamy soup. Pair it with some good bread or grilled cheese sandwiches, and you've got yourself a full meal. There's another secret about tomato soup. A lot of recipes (like this one) can be re-purposed into a delicious pasta sauce. This recipe is quite delicious, especially when served with toasted french bread at the bottom of the bowl. MMM!

From The Williams Sonoma Cookbook

INGREDIENTS:

6-8 slices french bread, each 1 inch thick
2 Tablespoons extra-virgin olive oil
1 large yellow onion, finely chopped
3 cloves garlic, minced
3 lbs. ripe tomatoes, peeled and seeded, then diced*
4 cups chicken stock or vegetable stock
1/2-1 cup bread crumbs
1/2 cup finely chopped basil leaves, plus 6-8 whole leaves, for garnish
salt and freshly ground pepper
1/2 cup freshly grated parmesan cheese

*Click here for instructions on how to peel and seed tomatoes. If you're in a hurry (like I always am) replace 1.5 lbs., or all of the fresh tomatoes, with canned, crushed tomatoes.

DIRECTIONS:

Preheat the oven to 300 degrees. Place the bread slices on a baking sheet and bake until lightly browned, turning once, 10-15 minutes total. Set aside.

In a large soup pot over medium heat, warm the oil. Add the onion and sauté, stirring frequently, until softened, 5-7 minutes. Add the garlic and cook until softened but not browned, about 30 seconds. Add the tomatoes and stock, raise the heat to high, and bring to a boil. Reduce the heat to medium-low, cover, and cook until the tomatoes are softened, about 30 minutes. Remove from heat.

Using an immersion or standing blender, purée the soup, leaving a little bit of texture if desired. Return the soup to the pot, if needed, and reheat gently over medium heat. If soup feels too thin, add bread crumbs until soup reaches desired texture. Add the chopped basil and season to taste with salt and pepper. To serve, place a slice of toasted bread in the bottom of each warmed bowl and sprinkle with a spoonful of parmesan cheese. Ladle the soup on top, garnish with a basil leaf, and serve at once.

Wednesday, March 16, 2011

Whole Wheat Chocolate Chip Cookies

It is very possible that my most favorite food in the whole world is homemade chocolate chip cookies. There is something so comforting about drinking a glass of cold milk accompanied by a perfect disc-shaped, chocolate-speckled treat. My go-to recipe is my mother's prize-winning recipe (hint: you can find it on the back of a bag of toll house chocolate chips) but, if you can recall, we currently don't have white flour in our house.

So, the search for a great whole wheat chocolate chip cookie has been at the top of my cooking priority list. I tried one that was OK, but not great. And then I found this one. This one.

My. Oh. My.

I'm pretty convinced that this is better than chocolate chip cookies made with white flour. Right before my mother tried this cookie, she said, "This looks like a Mrs. Field's cookie!" And then she made her "Mmmmm" noises that always make me feel good about my cooking. And I know it's my own mother, but she really is a connoisseur of all things chocolate. And let's face, I am my harshest critic. And this cookie is delicious! I'll try to stop rambling my excitement, but it's a little hard to contain when you've just found an amazing and beautiful chocolate-chip cookie recipe. Oh, and then top it off that it is 100% whole wheat. Eek! Could it be better? I think not. Ok, I'll be done now. Just go make this.


INGREDIENTS:

3 cups whole wheat flour
1 1/2 teaspoons baking powder
1 teaspoon baking soda
1 teaspoon kosher salt
2 sticks butter, cut into 1/2-inch cubes
1 cup lightly packed brown sugar
1 cup sugar
2 large eggs
1 teaspoon vanilla extract
8 oz. bittersweet chocolate, chopped into 1/4- to 1/2-inch pieces or chocolate chips (I don't have bittersweet, so I used semi-sweet chocolate chips)

DIRECTIONS:

Position racks in the upper and lower thirds of the oven and preheat it to 350 degrees. Line two baking sheets with parchment (or tin-foil).

Combine the flour, baking powder, baking soda, and salt in a medium bowl and whisk to combine.

Put the butter and sugars in a large bowl. With electric beaters (or a stand mixer with paddle attachment) on low to medium speed, mix just until the butter and sugars are blended. (This may take a while depending on how cold the butter is.) Scrape down the sides of the bowl with a spatula. Add the eggs, one at a time, beating well after each addition. Beat in the vanilla. 

Add the flour mixture to the bowl and blend on low speed until the flour is just incorporated. Scrape down the sides and bottom of the bowl. 

Add the chocolate and incorporate with a wooden spoon. Scrape down the sides of the bowl, then use your hands to turn and gently massage the dough, making sure all the flour is absorbed.

Scoop mounds of dough, about 3 tablespoons in size (yes, larger than your typical c.c. cookie), onto the baking sheets, leaving about 2-3 inches in between each cookie. You should be able to fit about 8 cookies on each sheet. 

Bake the cookies for 16-20 minutes, rotating the sheets halfway through, until the cookies are evenly browned. 

Let cool, pour some milk, and go to your happy place.